Getting started
OKAPI:Aether provides services to automated collision avoidance for satellite operators. To get started, you must have an account. If you have none yet, please schedule a demo to get started. When you have an account, to get started, you have two options: Receive warnings and analyses for
- your own satellite on orbit, or
- use a demo satellite with simulated data to familiarize yourself with the working of the system.
Connect your own satellite
Get started via GUI
At first, sign-in into OKAPI:Aether. Navigate to the Satellites tab, which you find in the topbar. Once inside that page, click on Add new, to add your first satellite. A formular opens to let you insert information on the satellite. The parameters listed in the GUI are the minimum configuration of OKAPI:Orbits' workflow. Most of them can be provided in more detail via the API. The following parameters are needed:
- Norad ID: The Norad identifier of your satellite. This parameter is important, as it is used to correlate the data with your satellite.
- Mass1: The current wet-mass of the satellite in kg.
- Cross section1: The cross-section of the satellite that is used during the object propagation and collision probability computation.
- Propulsion type2: Choose between impulsive and continuous propulsion systems.
- Thrust output: Define the thrust output of your propulsion system in Newton.
- Maximum thrust duration: Define how long the thruster can fire before it must shut off in seconds. This is needed especially for low thrust devices, which may need multiple burns to achieve the required delta-V.
- Thrust uncertainty: The 1-sigma uncertainty in the thrust output. If uncertain, use 10% for a start.
- Thrust pointing uncertainty: The 1-sigma uncertainty of your attitude system in degree.
- AI Risk Prediction: Decide whether to apply the AI risk prediction for this satellite.
- Manoeuvre Strategy3: Choose between a long-term and short-term collision avoidance strategy. The long-term strategy is achieved by an along-track separation, that usually requires less fuel but has to be applied early before the TCA. The short-term strategy is implemented by a radial separation that requires more fuel, but also a much shorter lead-time.
- Accepted Collision Probability: The collision probability that is acceptable for your mission. Most missions accept 1e-4.
- Accepted Minimum Distance: The minimum distance in km that is acceptable for your mission.
Last, we require some information on your status regarding Space-Track and the 18th SPCS respectively. The 18th SPCS provides collision data messages via Space-Track, which is one major source of information for us. Please choose the option that fits best to your mission. In most cases, your satellite is already registered with Space-Track. If this is the case, we will prepare an orbital data request that you will need to forward to the 18th SPCS.
Once you have entered all your information, click on save. You will be returned to the satellite view and see your satellite in the list. Initially, the status of your satellite will be set to Inactive. This means that we are checking the information you provided for your satellite and taking care of connecting the correct data. In most cases, we will contact you to finalize the access to conjunction data messages, therefore please make sure to regularly check the email address that you entered during the sign-up.
Once we have checked all data and received conjunction data messages for your satellite, the status of the satellite will be set to active.
Get started via API
Instead of the graphical user interface, you can also provide all data via the API. To facilitate the API communication, we provide open source connectors for most commonly used programming languages.
You will need the following endpoints:
- GET /satellites: returns a list of all your satellites
- POST /satellites: lets you add a new satellite
- DELETE /satellites: lets you delete an existing satellite
- PUT /satellites: lets you modify an existing satellite.
Workflows
From the time that your satellite is active, two workflows are continuously running for your satellite4.
Risk estimation workflow
The risk estimation workflow is always triggered when a new CDM is available.
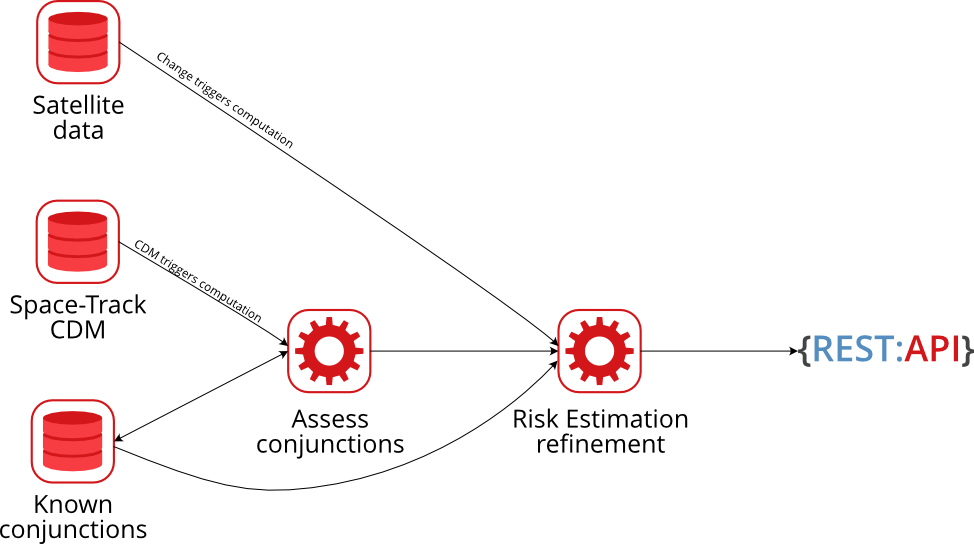
It fuses all data available for the satellite with the CDM data and provides an estimation on the criticality of the conjunction. The ratings "non-critical", "to-be-observed" and "critical" are available. The results of this workflow are available in the GUI in the conjunctions tab and via API under GET conjunctions.
Manoeuvre workflow
The manoeuvre workflow is always triggered when a conjunction is evaluated with the status "observer" or "critical".

In that case, collision avoidance manoeuvres are computed according to the defined strategy. All manoeuvres are furthermore screened in order to avoid any further conjunction during the following 10 days (from the time the analysis is performed).
The resulting manoeuvres are provided in the GUI and via API using GET /conjunctions/{conjunction_id}/maneuver-evals.
Notifications
By default, notifications are disabled. If you want to receive notifications, OKAPI:Aether provides notifications for the following events after their initial set-up:
- the status for your satellite was changed (from
InactivetoActiveor vice-versa), - a conjunction has been evaluated as either
to-be-observedorcritical.
If you additionally have the Collision Avoidance Service, when
- when manoeuvre evaluations are available for a
to-be-observedorcriticalconjunction,
We offer integration of notifications into Teams, Slack and potentially other third-party messenger tools. For that, please contact us directly.
Use a demo satellite
If you do not have your own satellite in Earth orbit (yet) that is not a problem ... at least not a problem that hinders you to check out OKAPI:Aether. We provide the possibility to use a simulated satellite to get to know the workings of services and learn how to use the API. Note that the demo satellite contains only staged data. Its only purpose is for you to learn how to use our service and how to connect it to your own software. If you need actual simulations to test procedures, please contact us directly.
Get started via GUI
Follow the same procedure described inside Get started via GUI. For the demo satellite it is important that you enter 9999999 as Norad ID. This ID is required to correctly correlate demo CDMs, conjunctions and manoeuvres. All other parameters, including your status with Space-Track and the 18th SPCS are only relevant for real satellites.
Once you have entered all your information, click on save. You will be returned to the satellite view and see your satellite in the list. Initially, the status of your satellite will be set to Inactive. After a short while, the status will be changed to Active, which means that you will be receiving conunctions and manoeuvre evaluations for your satellite from that point on. Again, note that this is only staged data. You can access the data either in the GUI or via API. Furthermore, from the time you have added your first satellite, you will receive notifications via email for important events, so ensure that you monitor the email address you used to sign-up for OKAPI:Aether. You will receive notifications when
- the status of your satellite changes,
- critical conjunctions are added for your demo satellite,
- manoeuvres have been computed for your demo satellite, and
- a to-be-observed conjunction was added for your demo satellite and manoeuvres are available for the conjunctions.
We offer integration of notifications into Teams, Slack and potentially other third-party messanger tools. For that, please contact us directly.
Get started via API
Instead of the graphical user interface, you can also provide all data via the API. To facilitate the API communication, we provide open source connectors for most commonly used programming languages.
You will need the following endpoints:
GET /satellites: returns a list of all your satellitesPOST /satellites: lets you add a new satelliteDELETE /satellites: lets you delete an existing satellitePUT /satellites: lets you modify an existing satellite.
Set up notifications
Notifications are by default available via Teams and Slack, but generally also other tools such as Mattermost can be connected. For that, please contact us directly. The notifications can be managed individually for each satellite, and are therefore saved in OKAPI:Aether together with other satellite information. Notifications can be added both via GUI (which is much easier) and API.
You can manage your notifications always when adding or editing a satellite. On the bottom right corner of the satellite form, you can choose toggle using Teams and Slack notifications. You can also enable both of them.
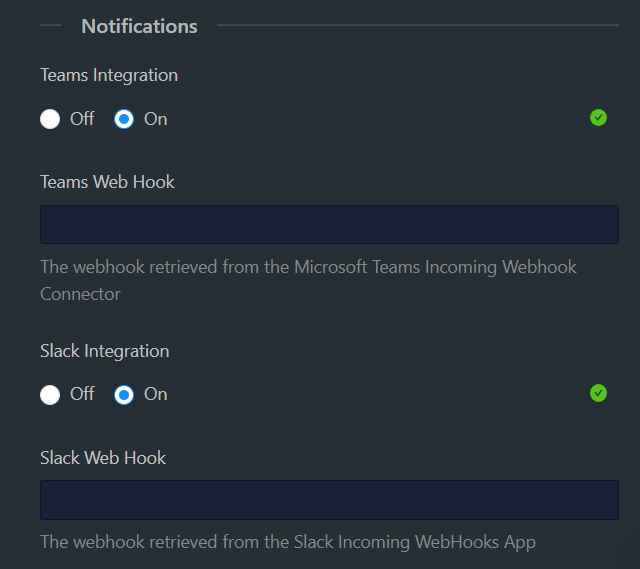
Both messengers are integrated via Webhooks. These need to be provided, but are generally straight-forward to set-up.
Sending notifications to Teams works via incoming webhooks. A webhook is basically a REST API that lets your channel receive messages from external applications. We give you here a fast set-up of the webhook, for more details, please refer to the documentation by Microsoft. A webhook is always added to one channel of a team within Teams. Before setting up a webhook, make sure that you chose a team and channel that reach all relevant people who shall receive the notification. Also, make sure that you enable Teams alerts for that channel. You can reach this setting by clicking on the "three dots" next to the channel name, then choose Channel notifications and All activity (or set-up a custom definition): 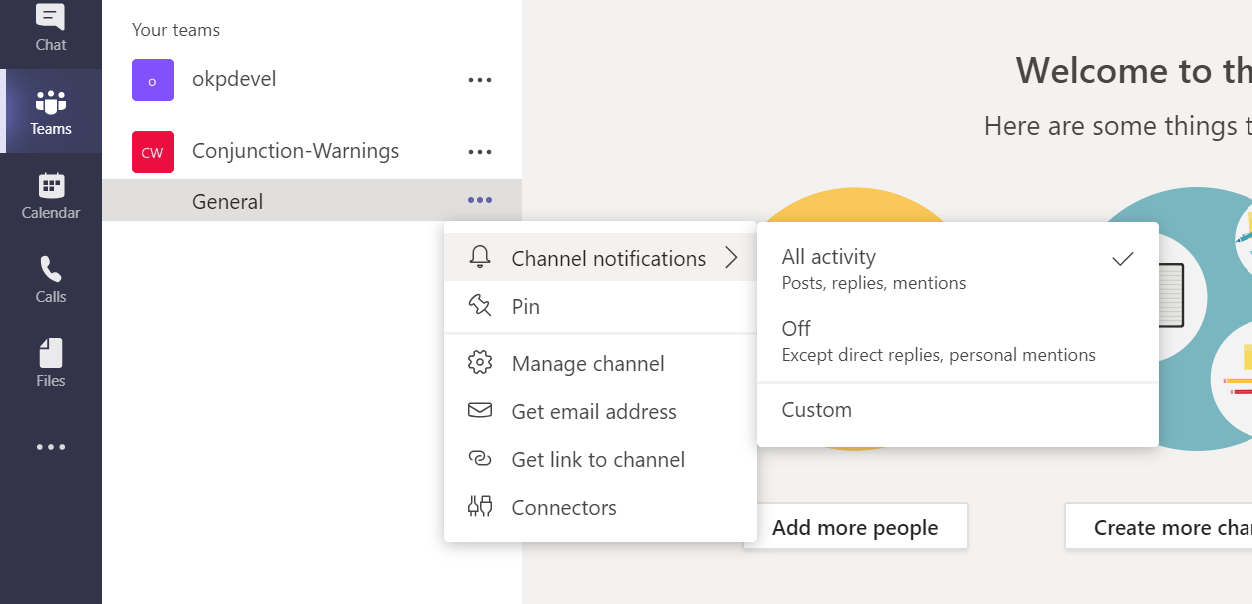 Next, you need to set-up the incoming webhook. For this, click on the
 Connectors in the channel settings (cf. figure above). A window will open to let you set-up connectors for your channel. Choose Incoming Webhook and click on Add: 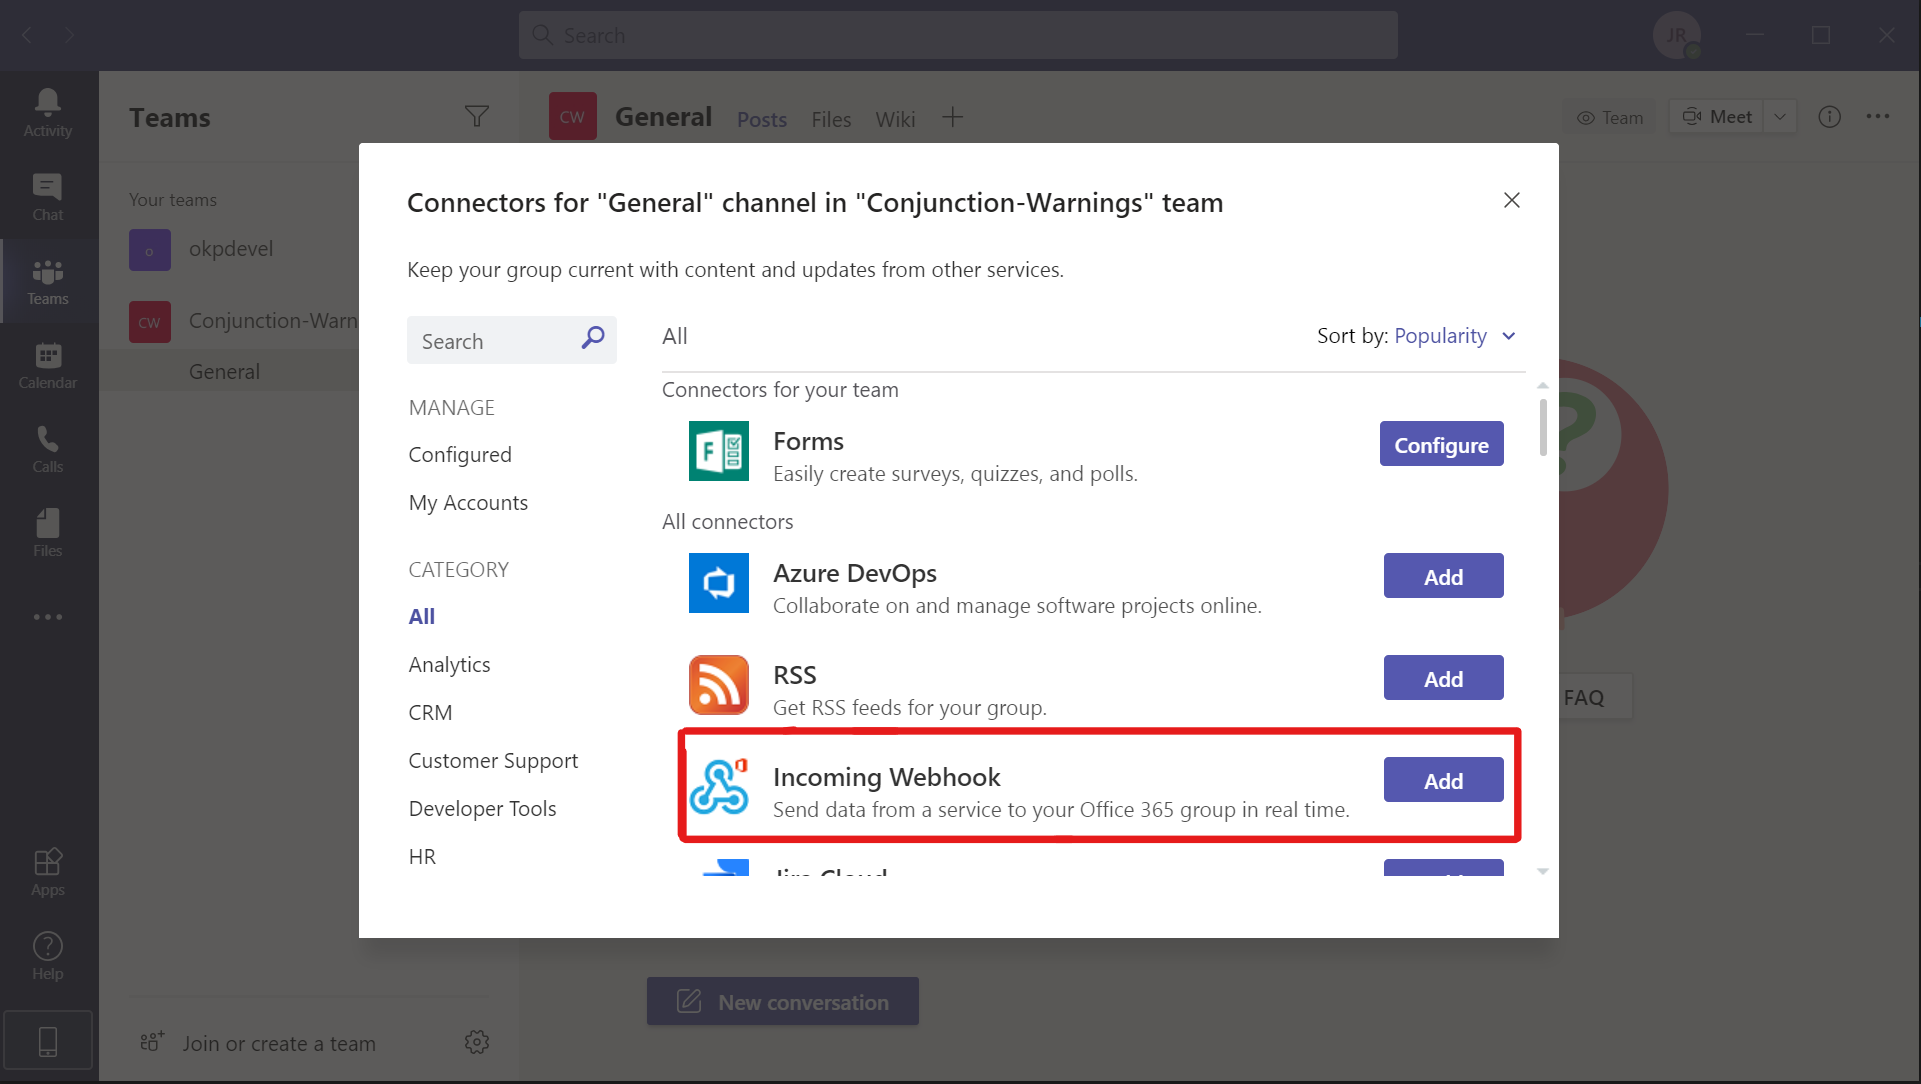 After adding, you will be asked for a name of the webhook. Make sure to give it an reasonable name, such as "OKAPI:Notifications". Furthermore, you can upload an image to more easily identify messages from different incoming webhooks. Click on
 create. Your webhook will send a first "Hello world" message to the channel. Furthermore, in the windows were you configured the name of the webhook, you will find a small field containing the webhook address:  Copy that address. It should have a general layout like
 https://outlook.office.com/webhook/VERY-LONG-URL (note: if you use customer URLs for Teams and SharePoint, this might look different).
Sending notifications to Slack works via webhooks. Slack provides an easy "how-to" here, which you can follow. Otherwhise, look for the Apps section on the left-hand-side of Slack, and choose Add apps. After this, search for "Incoming Webhooks", and add it: 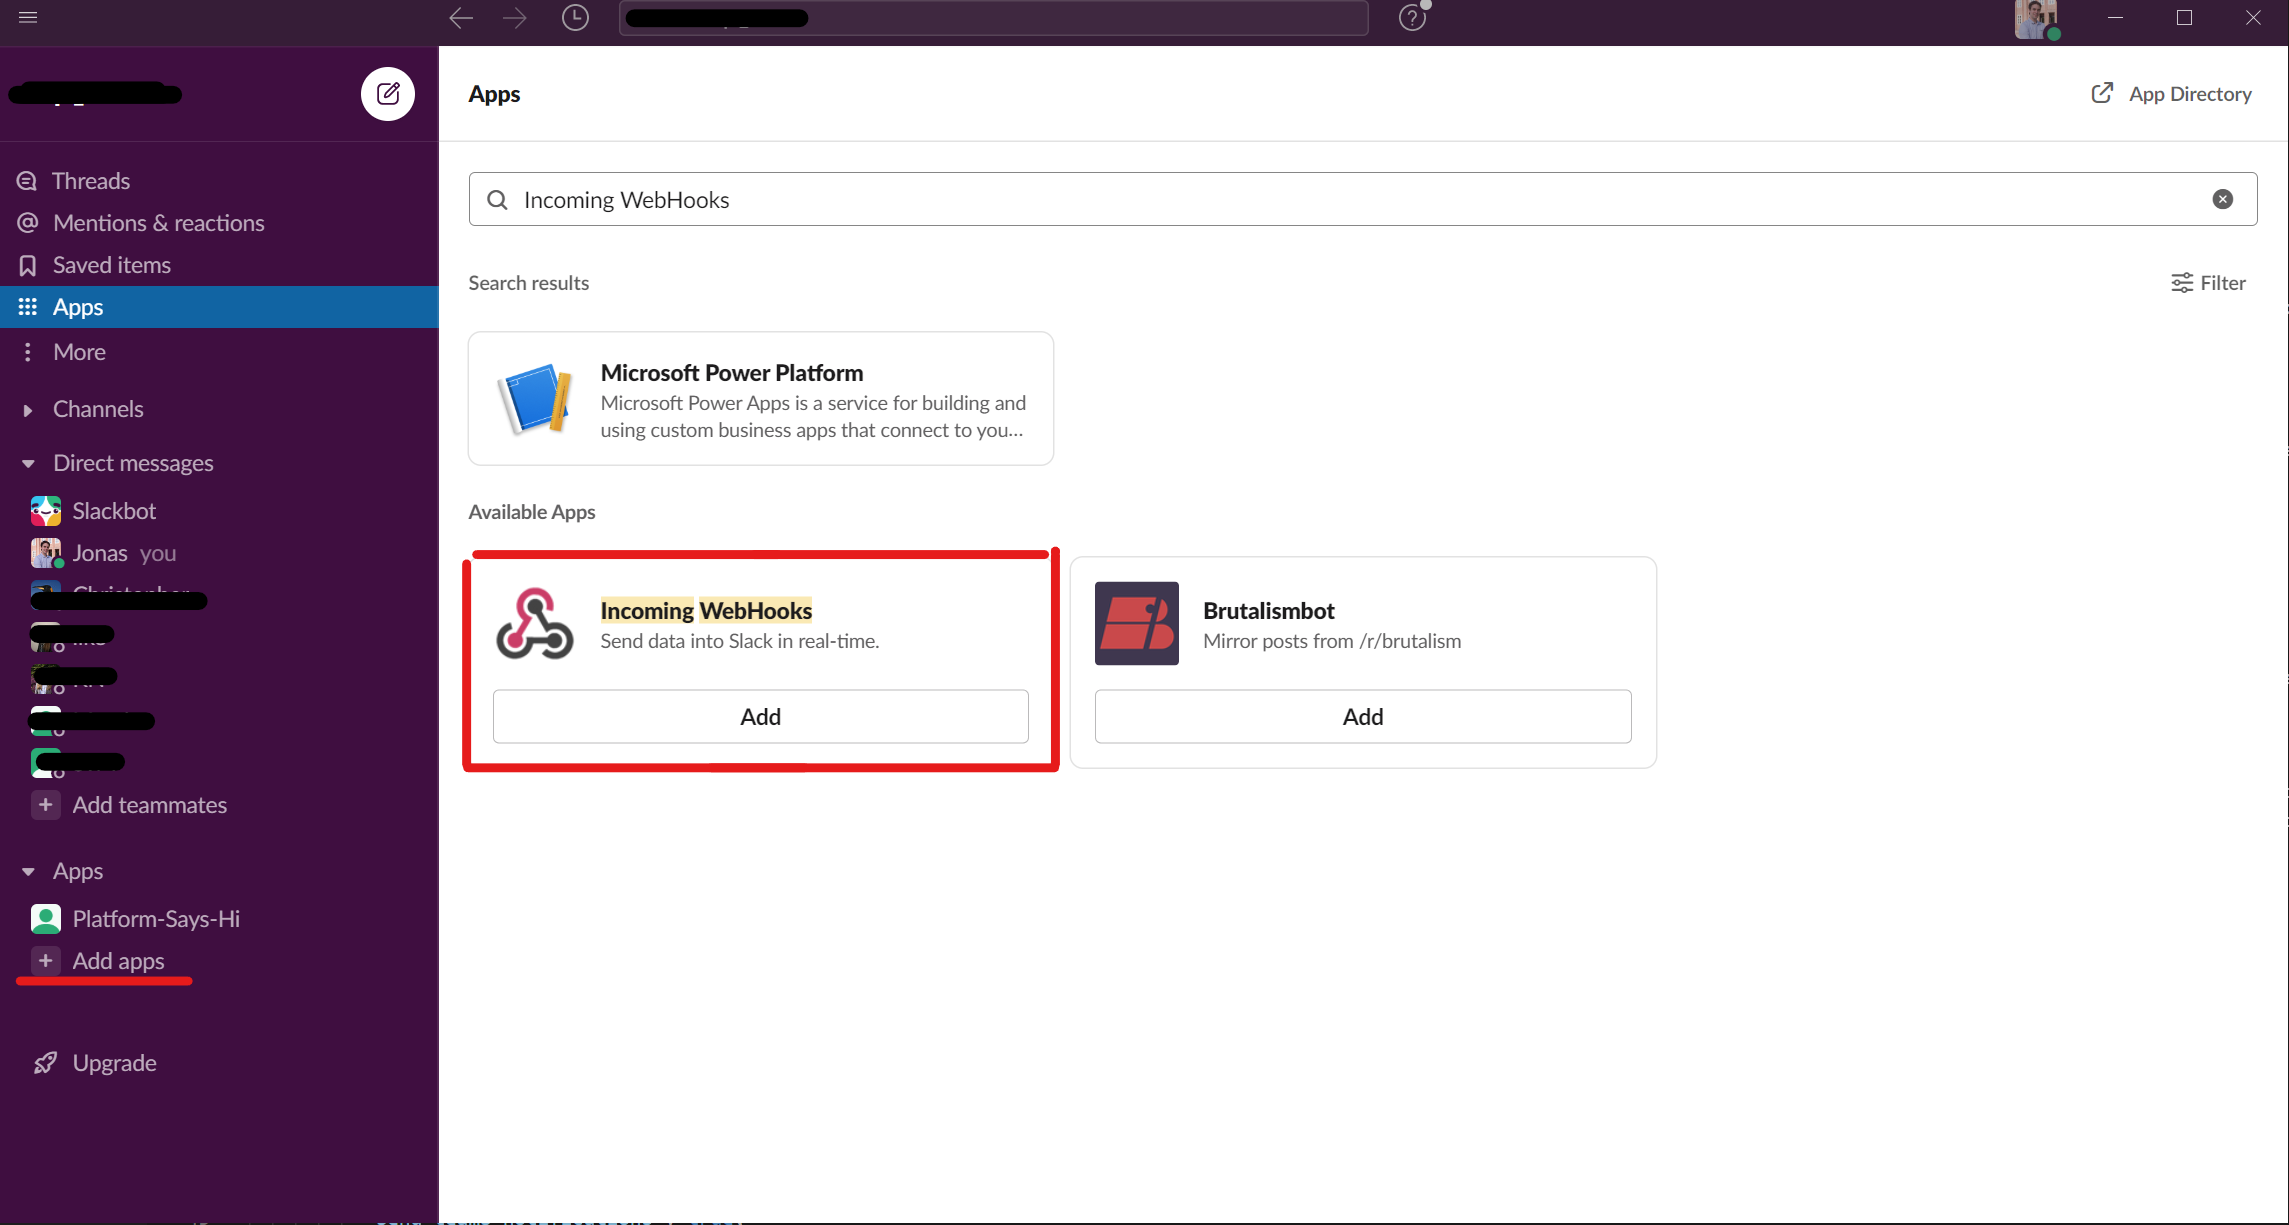 You will be redirected to your default web-browser and have to choose "Add Webhook" again. Afterwards, you will be asked to add the Webhook to a channel. Make sure to choose a channel that reaches all relevant people who shall receive the notification and that alerts are enabled for that channel (in other words: right-click on the channel name in Slack, and make certain that it is not muted). After, click on the big green button stating "Add Incoming WebHooks integration", and your webhook will be available. You will get to a settings page, from were you can copy the URL of the webhook. Generally, it looks something like
 https://hooks.slack.com/services/LONG-URL.
What needs to be done is to turn on notifications for your satellite. You can achieve this with basically every programming language that can handle REST API calls. Here, we will focus on achieving this from a terminal. For other languages, please refer to our connectors.
The guideline covers the following steps:
- Authenticate with the server,
- Get your satellites from the server,
- Change the settings for notifications and post the updated satellites to the server.
You can use this approach also to change any other properties of your satellite.
At first, you will have to authenticate with the server. To achieve this, you need to send an authentification request to OKAPI:Aether and save the received token. You can copy the following snippet, fill in your username and password and save it locally as authentication_request.json (or any other name you prefer):
  {
    "grant_type":"password",
    "username": "your-username",
    "password": "your-password",
    "audience": "https://api.okapiorbits.space/picard",
    "client_id": "jrk0ZTrTuApxUstXcXdu9r71IX5IeKD3",
    "scope": "scopes-are-ignored-for-now"
  }
Following, you will have to send the request to the server. Make sure to include the correct name of the body file and navigate in your terminal to the location of your file and execute:
wget --server-response --quiet --body-file=authentication_request.json --output-document=token.json --header="content-type: application/json" --method=POST https://okapi-development.eu.auth0.com/oauth/token
If successful (note the HTTP/1.1 200 in the first line of the output), it will save a token.json in that location that you will need to authenticate with the server.
Next, you will use the API to get your own satellites from OKAPI:Aether. To achieve this, run the following two commands:
  ACCESS_TOKEN_VALUE=`cat token.json | jq --raw-output .access_token`
  wget --content-on-error --output-document=satellites.json --header="Authorization: Bearer ${ACCESS_TOKEN_VALUE}" https://api.okapiorbits.com/satellites
You wil receive a satellites.json file containing all information about all your satellites. From here, how to proceed depends on the type of notification you want to enable. You can also enable more than one or all types of notifications.
Sending notifications to Teams works via incoming webhooks. A webhook is basically a REST API that lets your channel receive messages from external applications. We give you here a fast set-up of the webhook, for more details, please refer to the documentation by Microsoft. A webhook is always added to one channel of a team within Teams. Before setting up a webhook, make sure that you chose a team and channel that reach all relevant people who shall receive the notification. Also, make sure that you enable Teams alerts for that channel. You can reach this setting by clicking on the "three dots" next to the channel name, then choose Channel notifications and All activity (or set-up a custom definition): Next, you need to set-up the incoming webhook. For this, click on the Connectors in the channel settings (cf. figure above). A window will open to let you set-up connectors for your channel. Choose Incoming Webhook and click on Add: After adding, you will be asked for a name of the webhook. Make sure to give it an reasonable name, such as "OKAPI:Notifications". Furthermore, you can upload an image to more easily identify messages from different incoming webhooks. Click on create. Your webhook will send a first "Hello world" message to the channel. Furthermore, in the windows were you configured the name of the webhook, you will find a small field containing the webhook address: Copy that address. It should have a general layout like https://outlook.office.com/webhook/VERY-LONG-URL (note: if you use customer URLs for Teams and SharePoint, this might look different).
Now, go back to the satellites.json, look for the satellite for which you want to receive notifications and add the following two lines:
{
  ... ,
  "space_track_login": "example@someprovider.com",
  "active": true,
  "maneuver_strategy": "short_term_and_long_term",
  "send_teams_notifications": true,
  "teams_webhook": "https://outlook.office.com/webhook/REST-OF-URL"
}
With this, you have provided all information required to send notifications. You can add this for every satellite, for which you want to receive notifications. You can also use this process to disable notifications again (just set the send_teams_notifications to false).
Sending notifications to Slack works via webhooks. Slack provides an easy "how-to" here, which you can follow. Otherwhise, look for the Apps section on the left-hand-side of Slack, and choose Add apps. After this, search for "Incoming Webhooks", and add it: You will be redirected to your default web-browser and have to choose "Add Webhook" again. Afterwards, you will be asked to add the Webhook to a channel. Make sure to choose a channel that reaches all relevant people who shall receive the notification and that alerts are enabled for that channel (in other words: right-click on the channel name in Slack, and make certain that it is not muted). After, click on the big green button stating "Add Incoming WebHooks integration", and your webhook will be available. You will get to a settings page, from were you can copy the URL of the webhook. Generally, it looks something like https://hooks.slack.com/services/LONG-URL.
Now, go back to the satellites.json, look for the satellite for which you want to receive notifications and add the following two lines:
{
  ... ,
  "space_track_login": "example@someprovider.com",
  "active": true,
  "maneuver_strategy": "short_term_and_long_term",
  "send_slack_notifications": true,
  "slack_webhook": "https://hooks.slack.com/services/REST-OF-URL"
}
With this, you have provided all information required to send notifications. You can add this for every satellite, for which you want to receive notifications. You can also use this process to disable notifications again (just set the send_teams_notifications to false).
Now, after adapting the file you have to re-send it to the API. Currently, this is a little bit inconvenient, but will be more easy in the near future. The API only accepts single satellites, so you have to go back to your satellites.json file, copy that satellite for which you want to replace the information, and save it to a new file. The new file should look something like this (notice the curly brackets in the beginning and at the end):
{
  "satellite_id": "550e8400-e29b-11d4-a716-446655440000",
  "name": "Sputnik Test Group",
  "norad_ids": [
    1
  ],
  "area": 0.01,
  "mass": 1.3,
  "thrust_uncertainty": 0.01,
  "thrust_pointing_uncertainty": 120,
  "thrust_output": 1.1e-8,
  "max_thrust_duration": 1.3,
  "propulsion_type": "continuous",
  "accepted_collision_probability": 0.0001,
  "accepted_minimum_distance": 0.5,
  "use_ai_risk_prediction": false,
  "space_track_status": "satellite_registered",
  "space_track_status_other": "string",
  "space_track_company_name": "OKAPI:Orbits GmbH",
  "space_track_poc_name": "Max Musterman",
  "space_track_poc_address": "Examplestreet 32, 34562 Examplecity, Germany",
  "space_track_login": "example@someprovider.com",
  "active": true,
  "maneuver_strategy": "short_term_and_long_term",
  "send_slack_notifications": false,
  "send_teams_notifications": true,
  "slack_webhook": "https://hooks.slack.com/services/REST-OF-URL",
  "teams_webhook": "https://outlook.office.com/webhook/REST-OF-URL"
}
If you file is less nicely formatted that is no issue for the API, as long as the the curly brackets are in place and the "," are added after each value but the very last one. Also, the order of entries does not matter. We assume that you saved the file under the name
changed_satellite.json for the rest of this example.
Now, send a PUT request to OKAPI:Aether, using similar syntax as before. Not though that this time the request is a put and that the address needs to contain the satellite_id in the very end. So, copy the prompt stated below, and adapt it to contain the satellite_id(contain in the changed_satellite.json) to the very end before executing the command:
wget --content-on-error --output-document=response.json --body-file=changed_satellite.json --header="Authorization: Bearer ${ACCESS_TOKEN_VALUE}" --header="Content-Type: application/json" --method=PUT https://api.okapiorbits.com/satellites/satellite_id
Now, you are done. You can also use this approach to disable all notifications.
At first, you will have to authenticate with the server. To achieve this, you need to send an authentification request to OKAPI:Aether and save the received token. You can copy the following snipped, fill in your username and password and save it locally as authentication_request.json (or any other name you prefer):
  {
    "grant_type":"password",
    "username": "your-username",
    "password": "your-password",
    "audience": "https://api.okapiorbits.space/picard",
    "client_id": "jrk0ZTrTuApxUstXcXdu9r71IX5IeKD3",
    "scope": "scopes-are-ignored-for-now"
  }
Following, you will have to send the request to the server. Make sure to include the correct name of the body file and navigate in your terminal to the location of your file and execute:
wget -Uri https://okapi-development.eu.auth0.com/oauth/token -Headers @{"content-type"="application/json"} -Method POST -Body $(get-content authentication_request.json -raw) -OutFile "token.json"
If successful (note the HTTP/1.1 200), it will save a token.json in that location that you will need to authenticate with the server.
Next, you will use the API to get your own satellites from OKAPI:Aether. To achieve this, run the following two commands:
  $token = (Get-Content '.\token.json' | ConvertFrom-Json).access_token
  wget -Uri https://api.okapiorbits.com/satellites -Headers @{"Authorization"="Bearer "+$token} -OutFile "satellites.json"
You wil receive a satellites.json file containing all information about all your satellites. From here, how to proceed depends on the type of notification you want to enable. You can also enable more than one or all types of notifications.
Sending notifications to Teams works via incoming webhooks. A webhook is basically a REST API that lets your channel receive messages from external applications. We give you here a fast set-up of the webhook, for more details, please refer to the documentation by Microsoft. A webhook is always added to one channel of a team within Teams. Before setting up a webhook, make sure that you chose a team and channel that reach all relevant people who shall receive the notification. Also, make sure that you enable Teams alerts for that channel. You can reach this setting by clicking on the "three dots" next to the channel name, then choose Channel notifications and All activity (or set-up a custom definition): Next, you need to set-up the incoming webhook. For this, click on the Connectors in the channel settings (cf. figure above). A window will open to let you set-up connectors for your channel. Choose Incoming Webhook and click on Add: After adding, you will be asked for a name of the webhook. Make sure to give it an reasonable name, such as "OKAPI:Notifications". Furthermore, you can upload an image to more easily identify messages from different incoming webhooks. Click on create. Your webhook will send a first "Hello world" message to the channel. Furthermore, in the windows were you configured the name of the webhook, you will find a small field containing the webhook address: Copy that address. It should have a general layout like https://outlook.office.com/webhook/VERY-LONG-URL (note: if you use customer URLs for Teams and SharePoint, this might look different).
Now, go back to the satellites.json, look for the satellite for which you want to receive notifications and add the following two lines:
{
  ... ,
  "space_track_login": "example@someprovider.com",
  "active": true,
  "maneuver_strategy": "short_term_and_long_term",
  "send_teams_notifications": true,
  "teams_webhook": "https://outlook.office.com/webhook/REST-OF-URL"
}
With this, you have provided all information required to send notifications. You can add this for every satellite, for which you want to receive notifications. You can also use this process to disable notifications again (just set the send_teams_notifications to false).
Sending notifications to Slack works via webhooks. Slack provides an easy "how-to" here, which you can follow. Otherwhise, look for the Apps section on the left-hand-side of Slack, and choose Add apps. After this, search for "Incoming Webhooks", and add it: You will be redirected to your default web-browser and have to choose "Add Webhook" again. Afterwards, you will be asked to add the Webhook to a channel. Make sure to choose a channel that reaches all relevant people who shall receive the notification and that alerts are enabled for that channel (in other words: right-click on the channel name in Slack, and make certain that it is not muted). After, click on the big green button stating "Add Incoming WebHooks integration", and your webhook will be available. You will get to a settings page, from were you can copy the URL of the webhook. Generally, it looks something like https://hooks.slack.com/services/LONG-URL.
Now, go back to the satellites.json, look for the satellite for which you want to receive notifications and add the following two lines:
{
  ... ,
  "space_track_login": "example@someprovider.com",
  "active": true,
  "maneuver_strategy": "short_term_and_long_term",
  "send_slack_notifications": true,
  "slack_webhook": "https://hooks.slack.com/services/REST-OF-URL"
}
With this, you have provided all information required to send notifications. You can add this for every satellite, for which you want to receive notifications. You can also use this process to disable notifications again (just set the send_teams_notifications to false).
Now, after adapting the file you have to re-send it to the API. Currently, this is a little bit inconvenient, but will be more easy in the near future. The API only accepts single satellites, so you have to go back to your satellites.json file, copy that satellite for which you want to replace the information, and save it to a new file. The new file should look something like this (notice the curly brackets in the beginning and at the end):
{
  "satellite_id": "550e8400-e29b-11d4-a716-446655440000",
  "name": "Sputnik Test Group",
  "norad_ids": [
    1
  ],
  "area": 0.01,
  "mass": 1.3,
  "thrust_uncertainty": 0.01,
  "thrust_pointing_uncertainty": 120,
  "thrust_output": 1.1e-8,
  "max_thrust_duration": 1.3,
  "propulsion_type": "continuous",
  "accepted_collision_probability": 0.0001,
  "accepted_minimum_distance": 0.5,
  "use_ai_risk_prediction": false,
  "space_track_status": "satellite_registered",
  "space_track_status_other": "string",
  "space_track_company_name": "OKAPI:Orbits GmbH",
  "space_track_poc_name": "Max Musterman",
  "space_track_poc_address": "Examplestreet 32, 34562 Examplecity, Germany",
  "space_track_login": "example@someprovider.com",
  "active": true,
  "maneuver_strategy": "short_term_and_long_term",
  "send_slack_notifications": false,
  "send_teams_notifications": true,
  "slack_webhook": "https://hooks.slack.com/services/REST-OF-URL",
  "teams_webhook": "https://outlook.office.com/webhook/REST-OF-URL"
}
If your file is less nicely formatted that is no issue for the API, as long as the the curly brackets are in place and the "," are added after each value but the very last one. Also, the order of entries does not matter. We assume that you saved the file under the name
changed_satellite.json for the rest of this example.
Now, send a PUT request to OKAPI:Aether, using similar syntax as before. However, this time the request is a put and that the address needs to contain the satellite_id in the very end. So, copy the prompt stated below, and adapt it to contain the satellite_id(contain in the changed_satellite.json) to the very end before executing the command:
wget -Uri https://api.okapiorbits.com/satellites/satellite_id -Headers @{"Authorization"="Bearer "+$token;"content-type"="application/json";"Accept"="application/json"} -Method PUT -Body $(get-content changed_satellite.json -raw)
Now, you are done. You can also use this approach to disable all notifications.
-
These parameters can be connected using a custom data source using the API. ↩↩
-
Using a custom data source, you can provide us with many more details about your propulsion system, including operational constraints. ↩
-
Through customization, we can adopt many other collision avoidance manoeuvre strategies. ↩
-
The actually running workflows depend on your subscription and potential customization. During the free trial, both the risk estimation package and manoeuvre package are active, which is assumed here. ↩